How felted pet replicas are made
It starts with a photo and a pile of wool. What happens between those two points takes 2-15 days of patient handwork.
People ask us about the process a lot. So here it is, the full breakdown of needles, wool, and stubbornness.
Step 1: Reviewing your pet photos
Before any wool gets touched, we sit with the photos you send us. We're looking at proportions, coloring, the way your pet holds their ears, the exact shade of their eyes, any weird markings that make them them.
For 3D felted pet replicas, we need photos from multiple angles: front, both sides, rear, close-ups of the face. The more reference photos we have, the more accurately we can nail what makes your pet look like your pet and not just "some pet."
This is also where we figure out size, pose, and general approach.
Step 2: Picking the wool
Not all wool is the same, and different fibers do different jobs in a felted pet portrait.
Corriedale batts or slivers form the dense core structure. They're sturdy and hold their shape well. Merino tops go on the outside for smooth, refined surfaces, which works well for short-haired breeds. Alpaca blends add softness and a subtle sheen, so they're good for fluffy breeds. And Shetland or rougher wools handle textured, wiry coats like terriers.
We pick wool colors to match your pet's coat as closely as possible. Instead of using a single flat shade, we blend 2-3 tones together. That layering is what gives the finished piece the natural color variation you see in real fur.
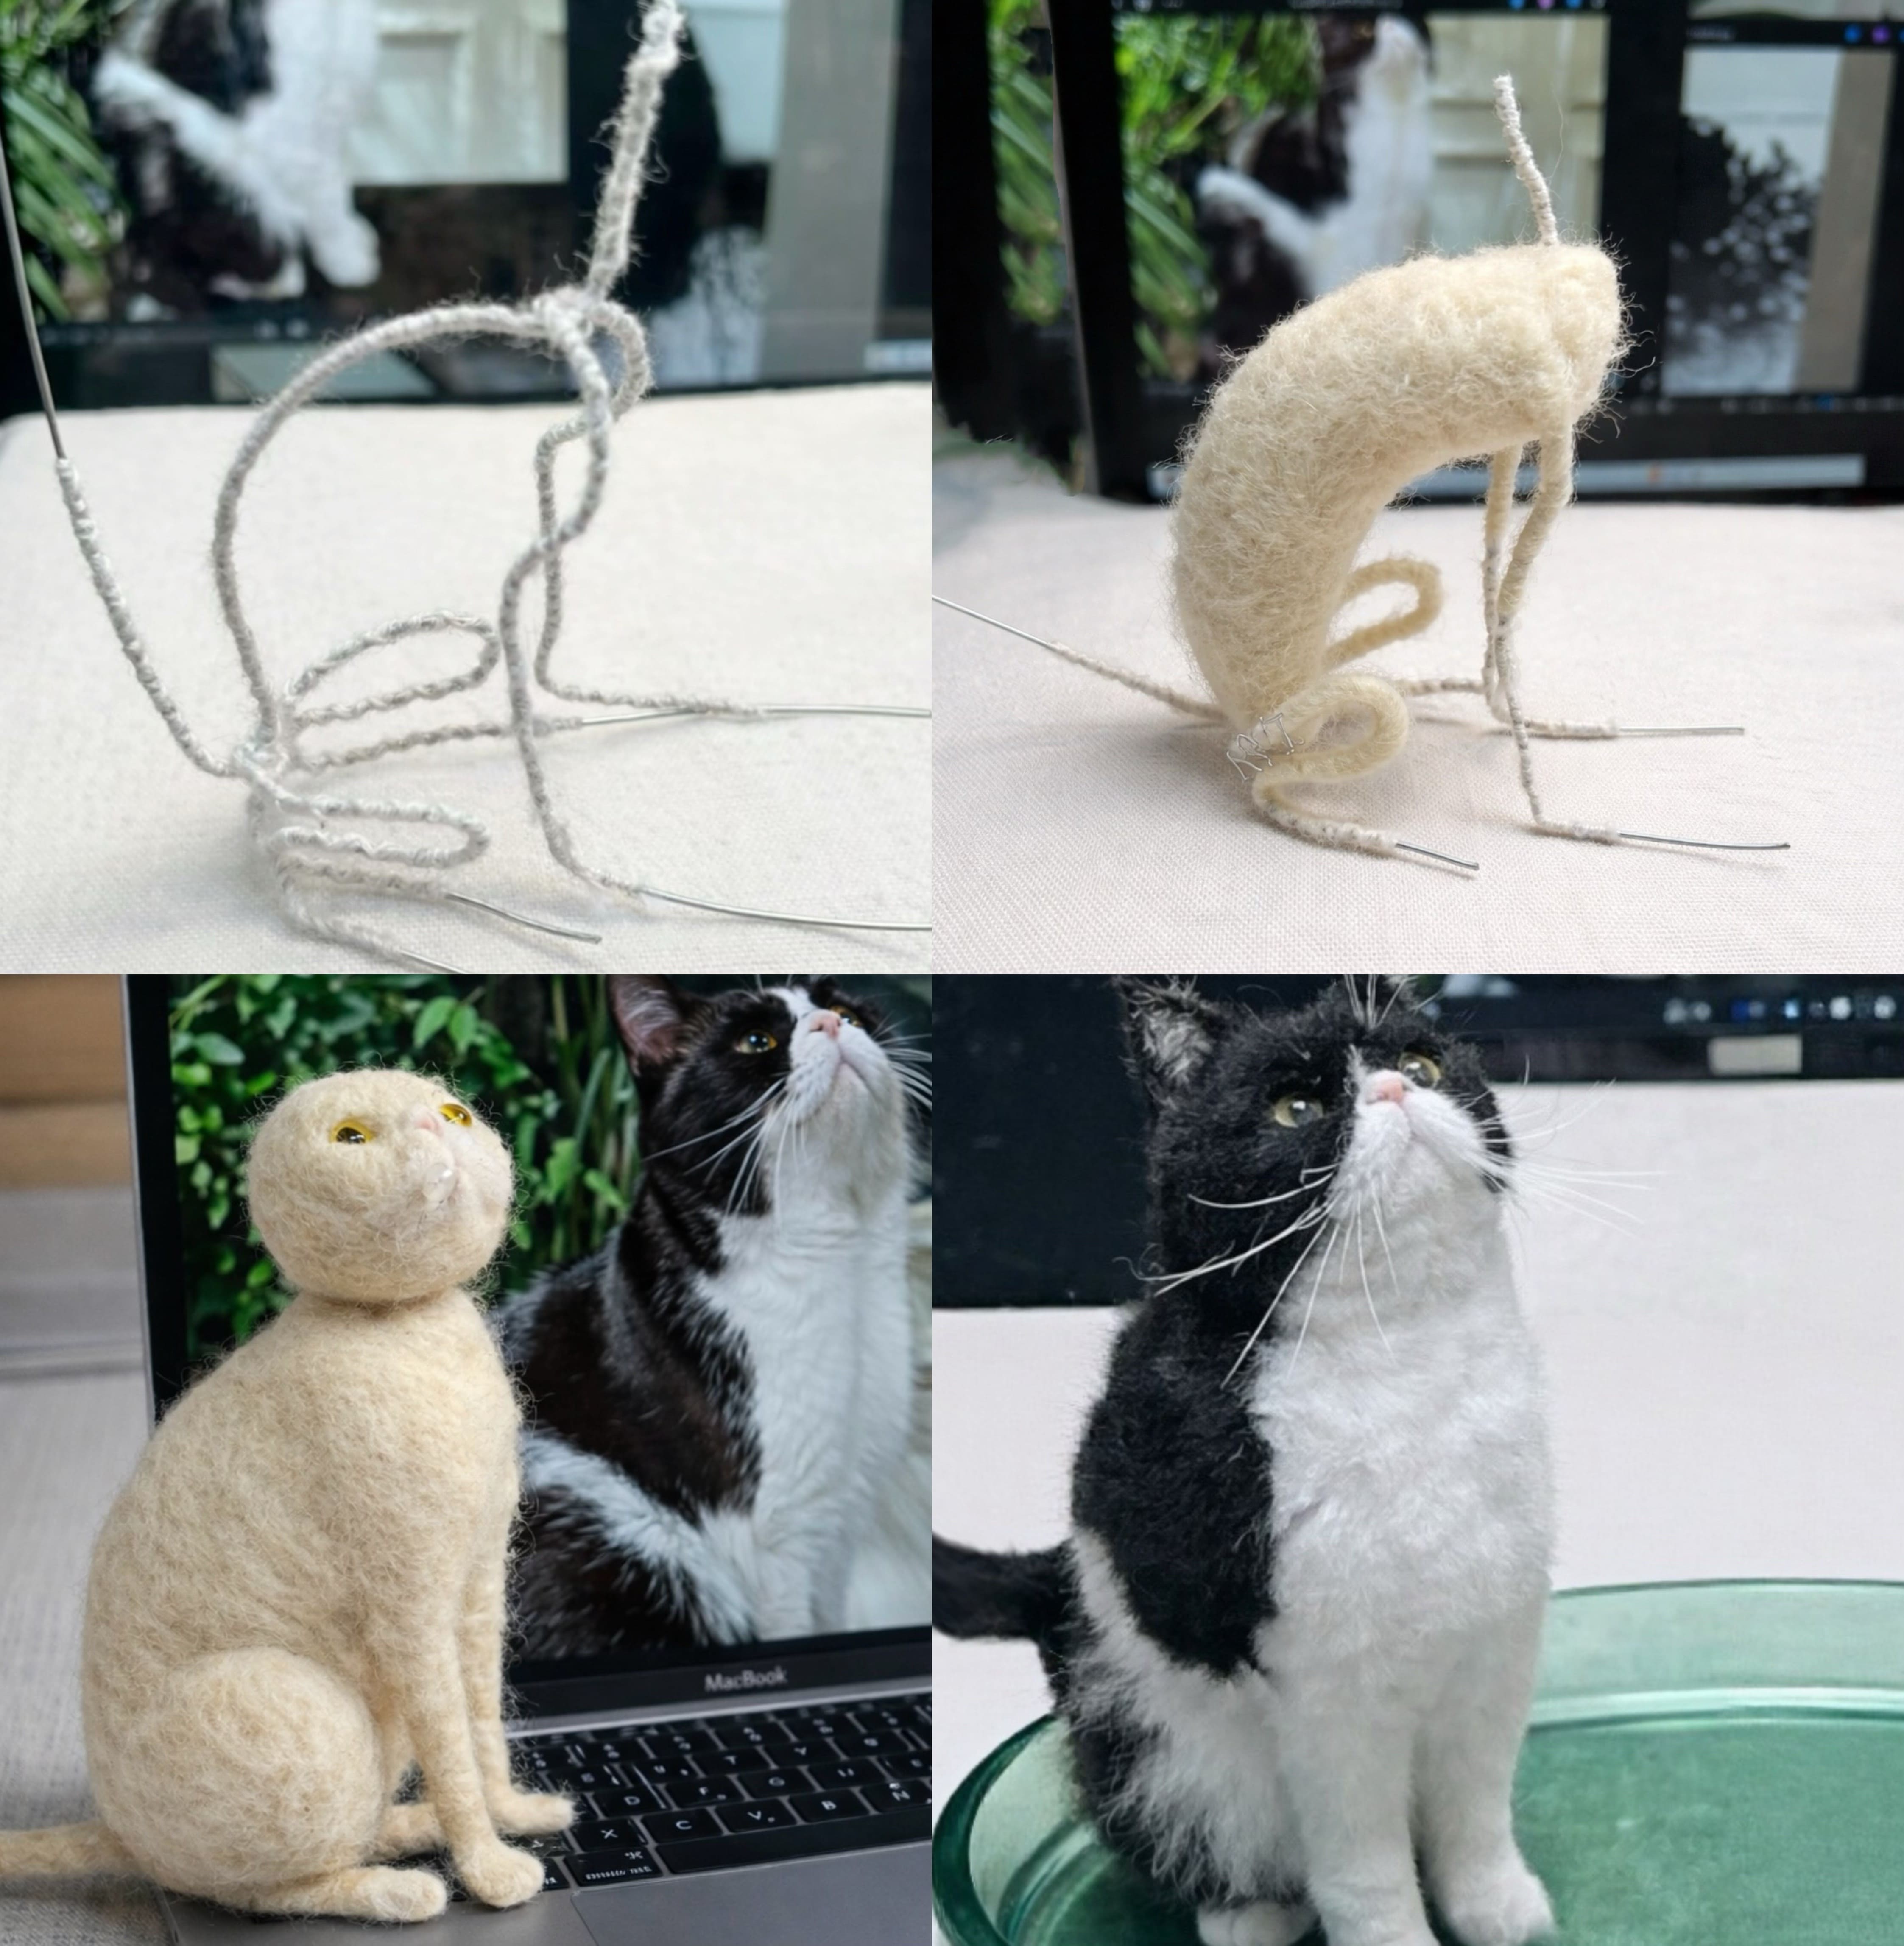
Step 3: Building the wire armature (3D replicas)
For full 3D felted pet sculptures, the process starts with a wire armature. Think of it as a tiny skeleton that gives the piece structure and lets it hold a pose.
Thicker wire supports the body and main limbs. Thinner wire handles details like tails and ears. Joints get twisted securely where limbs meet the body.
The armature sets the pose (standing, sitting, lying down), so we test balance before committing. Once we're happy with it, we wrap the wire tightly with core wool. That gives us the foundation for sculpting.
Step 4: Sculpting the core shape
With the armature wrapped, we start building up the body using core wool and a 36-38 gauge triangular felting needle. This is the grunt-work stage. You're repeatedly stabbing the needle into the wool, which compresses and interlocks the fibers into a solid, dense form.
We work in basic geometric shapes: cylinders for legs and body, spheres for the head, tapered forms for the muzzle and tail.
Each body part is sculpted separately, then attached by anchoring with loose wool fibers and felting the joints smooth. Throughout this stage we're constantly checking proportions against your reference photos to make sure the felted pet replica looks right from every angle.
Step 5: Adding color and fur texture
Once the shape is solid, we layer on the colored wool that becomes your pet's visible coat. This is where a felted pet portrait really starts looking like an actual animal instead of a wool blob.
Different fur types need different approaches:
Smooth short fur (Labrador, Beagle) gets fine needles and thin layers of merino, carefully smoothed down. Long flowing fur (Sheltie, Persian cat) means laying longer fibers directionally and protecting them while the underlying sections get felted. Curly or wavy fur (Poodle, Spaniel) requires its own techniques to create texture without matting everything together. Wiry coats (Schnauzer, Terrier) use rougher wool types with deliberate, messy texture.
The hand-blending technique is what makes the colors look real. We stack wool lengths in matching directions, gently pull them apart, re-stack, and repeat. The result is gradual color transitions that look like actual animal markings, not paint.
Step 6: Crafting the face and eyes
Honestly, the face is where the whole thing either works or doesn't. A felted pet replica with a wrong face is just a generic animal. We spend more time here than on any other single step.
The eyes are what bring a needle felted pet portrait to life. Using your reference photos, we carefully match your pet's eye colour, pupil shape, and size from our collection of high quality plastic craft eyes. If no pre-made eye is quite right, we hand-paint one ourselves by custom-mixing colours to recreate the exact hue and depth of your pet's gaze. Every eye is chosen to give your portrait a truly lifelike expression.
We sculpt eyelids to add expression. A sleepy dog, an alert cat, a curious rabbit. Where the eyes sit relative to the face shape, how deep they're set, how far apart they are: all of this affects whether the finished piece looks like your pet or just a pet.
Ears are shaped on the armature wire and layered with wool to match your pet's ear type, whether that's floppy, pointed, folded, or tufted.
Step 7: Paws, toes, and fine details
For 3D felted pet replicas, paws get their own stage.
The quick method uses core wool layered with merino tops, with fine black wool lines defining individual toes. The detailed method wraps wool around thin wire to form each individual toe, then assembles them into a complete paw. Paw pads are small circular wool shapes felted onto the underside.
Toenails can be formed from hardened wool tips, or by leaving short wire exposed and coating it with wax.
Step 8: Whiskers and finishing touches
The last details in a felted pet portrait are small but they matter.
Whiskers go in using horsehair, fishing line, or fine bristles. We poke small holes with a fine needle, put a tiny drop of adhesive on the whisker tip, and position each one with tweezers. Uneven lengths look more natural than even ones. Usually 6-12 whiskers depending on the species.
From our experience, lots of pet lovers have kept their pet's real whiskers for opportunities like this. They often chose to ship them to us in an envolope so we could apply the real ones to make the felting more meaningful. A video of the revealing process is always recorded and sent to the owners.
Step 9: Quality check and your approval
Before anything ships, every felted pet replica goes through our review process.
We do a side-by-side comparison with your original photos. We send you 360-degree photos and a video so you can see it from all angles. If anything needs adjusting (color, expression, proportions), we make changes based on your feedback. Nothing ships until you sign off.
The forgiving part
One thing that makes needle felting work well for this kind of detail: mistakes are fixable. If something doesn't look right, we can snip or pull parts off, lift fibers with a reverse needle to reshape them, or cover rejoined areas with thin fresh wool layers.
That flexibility is why we can keep making adjustments even late in the process, and why needle felting can produce such detailed results. We just keep going until it looks right.
Where the 2-15 days go
People are usually surprised when they hear the time. Here's the rough breakdown:
| Stage | Approximate time |
|---|---|
| Photo review and planning | 1-2 hours |
| Wool selection and blending | 2-4 hours |
| Wire armature (3D only) | 2-5 hours |
| Core sculpting | 5-35 hours |
| Color layering and fur texture | 4-25 hours |
| Face and eyes | 5-15 hours |
| Paws and fine details | 5-15 hours |
| Whiskers and finishing | 2-3 hours |
| Quality check and adjustments | 5-15 hours |
Every one of those hours is visible in the finished piece. There's no way to rush needle felting without it showing.
If you want one
Now you know what goes into it. If you've got a pet you'd like turned into wool, whether that's a 2D felted pet portrait for your wall, a 3D pet replica for your shelf, or a small felted pet ornament to keep nearby, the process is the same for all of them.